Here are a few tips for those who are learning to play the steel guitar. Some of them may seem obvious; some of them not so much.
1. Don’t be discouraged by the difficulty of getting your chord grips together (meaning your picking hand).
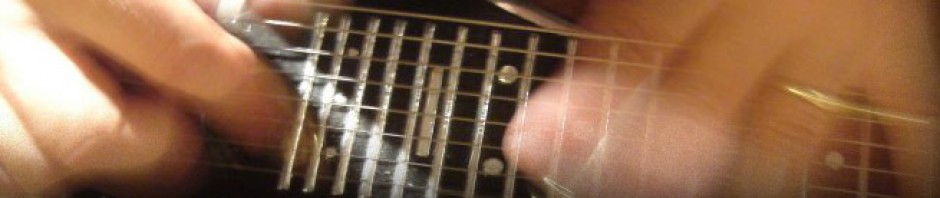
Do practice your grips, even in a non-musical fashion. For instance, practice grabbing a chord shape and then moving it from one string set to another, like this:

Things like this take time to master, but the more you practice, the easier it will become. Spend 5 to 10 minutes/day just on grips, not worrying that it doesn’t sound musical.
2. Don’t slide into everything (glissando).
Do use glissando sparingly, selecting the right time for maximum effect. Do practice moving the bar vertically along the neck using a staccato approach in order to gain more control of your sound. To do this, you will need to incorporate pick blocking. Also, the bar doesn’t leave the strings with this approach–it is completely reliant on your right hand.
3. Don’t get stuck in root, or straight bar positions (i.e., for playing in C major, sticking to the 12th fret).
Do find other positions or zones or pockets to play in. For example, you can get a C major sound (minus the root) by playing in G position (7th fret, C6 tuning). This serves as CMaj9. For playing singles notes, we can easily find our way through the C major scale in 7th position:

Do learn how to play a scale in every position, meaning beginning with any scale tone anywhere on the neck. Here’s another very useful example:

Do practice this in every key (including natural, harmonic and melodic minor) beginning on any note of the scale. Yes, I know it is a lot of work, but in order to gain freedom on the instrument, particularly from clichés, this is the kind of work that needs to be done. Spend 1/2 hour/day on this for several months until you are confident you can break it out easily and without hesitation.
4. Don’t forget that there are many ways to achieve something that doesn’t look feasible at first glance.
Do remember to investigate all options by thinking about slants (no matter how extreme they may seem) and behind the string bar string pulls. Here is an example of a I – IV – V progression with voice leading (note the tuning is C6/A7):

Notice how you can play 2 different inversions of the I-IV-V progression and keep the chords in a relatively small fretboard range.
5. Don’t let vibrato be an afterthought.
Do learn to be conscious of your use (or non-use) of vibrato, making conscious decisions on how you want it to enhance your phrase ahead of time. Don’t wait until the last moment to throw a quick shake on a note–it tends to sound feeble and nervous. Be confident and strong in your playing! Commit….
6. Don’t underestimate the value of major and minor triads. They have many more uses than just the obvious.
Do learn as many inversions of your major and minor triads as you can possibly find, everywhere on the neck. The major and minor triads can serve as altered dominant chords as well as extended harmonies of major and minor chords. Sometimes we overlook the simplicity of a simple triad while searching for something bigger, such as G13b9; if you are knowledgeable in harmony and music theory, it should be easy for you to spell this chord out:
G B D F Ab E (we skip the 11th degree, C). Looking at these 6 notes, what triads do we find? Obviously G, but what else? There is a B diminished triad, as well as D diminished. But we also have an E major triad. The E maj triad provides the M3, b9 and 13 of our chord. Perfect choice for G13b9. Need something for an A7 chord functioning as a V7 or VI7 in a turnaround? Try a Bbmin triad (Bb Db F) instead. Those notes spell b9, M3 and #5, a nice altered dominant sound. See what I’m getting at?…which leads me to….
7. Don’t shy away from learning basic music theory and harmony: they are your friends.
Do get acquainted with them because they open up doors and make it much easier for you to make music that’s outside of the box. It is always good to have choices.
8. Don’t use your wrist to make slants!
Do try to get used to guiding the bar with your fingers. Do make sure you are using the right bar. There have been endless discussions about whether a Stevens bar or Bullet bar or any other number of bars is right–I won’t go there. I will say that whatever bar you choose, make sure it is the right length and make sure you learn to manipulate it with your fingers, not your wrist.
9. Don’t let your playing sound monotone.
Do open it up and use your picking hand and bar to convey expression. Sometimes a nice strum of a chord with your thumb, or a wide bar shiver (ala Curly Chalker) can keep your playing from sounding monotonous and lifeless. Jerry Byrd was called the Master of Touch and Tone for good reason: he was always conscious of his expression and you could really get a feeling from his playing the way that you could from a singer or violinist. Harmonics are another great way to make it work.
10. Don’t get hung up by bad picking habits.
Do focus on making your digits work as a unit. There is quite a bit of work involved in getting a strong right picking hand. There are definitely picking patterns which you can work with on a daily basis to get your right hand under control. Joe Wright has a video called “Secrets Of The Wright Hand” which may help you to improve your picking technique. The video has no musical content, but Joe works you through a number of picking moves.
11. Don’t pick too hard. “What is too hard?”, you ask. Well, it’s when your strings are flapping out of control, sharp in pitch, and your fingerpicks are getting tangled up in the strings. Relax!
Do play in a relaxed, controlled manner. There is a lot to be said for a picker who has great chops, whether or not he/she decides to put them on display. The one thing every great picker has is poise and control. Comes with practice, nothing more. For those of us coming from a resonator background, this can be quite a revelation. The picking styles are quite different for both instruments (and so is the bar technique for that matter). Many people believe that the players who can really play both resonator and electric steel extremely well are rare birds. They’re probably right!
Hope this gives you something to think about. Time to run!
Darren Addy says:
I would also love to see the missing images on this page:
http://www.lapsteelin.com/tag/music-theory/
Thanks for your work on this site!
Lloyd Graves says:
Just found your blog after playing a few years. Great tips. Sadly, none of the images seem to be working anymore. Any chance they can be reattached? I’m definitely stuck in a straight bar, root chord, rut, and would love to explore your recommendations.
As for #7, what resources do you recommend for learning basic music theory? I pick up what I can from other musicians but there aren’t any steel players near me.
Dennis Bridgewater says:
i play a hammer dulcimer in a dulcimer group and they have to play in the key of D which has 2 sharps in it with the c and f. so how do u tune the lap steel to get both the sharps in there or do u use the bar to do it. im thinking about takeing up the lap steel and all this stuff u have said is queek to me so any help would be greatly appreciated
clayton willoughby says:
Thank you Mike for all of your wonderful tips on here.
clayton willoughby says:
Also play with feeling and use dynamics as part of your musical vocabulary. First learn the song “straight”, then try to put fill-ins in between verses and choruses to fill it up. Also when you learn a lick in a certain “pocket” try to see if you can find and play it on another part of the neck this will increase your skill and also might help you not have to travel as far on the neck when you use that lick. Mix up your right hand grips so that you’re not just playing two string plucks. “Dynamics” can be anything from playing louder or softer as necessary to going from one or two note grips to 3 note grips. It adds a lot to your playing.
Jon says:
Got it now, G major triad. G#
Mike Neer says:
It may seem like splitting hairs, but that is not exactly correct, because you would have to call the b9 in G Ab–you can not have a G# if the tonic is G, and being that the 9th is A and it becomes flatted, it is Ab.
Jon says:
How do you get the b9 (Ab) out if the E major triad ( E-G-B)? Just wondering if I missed something here.
Mike Neer says:
Jon, I’m not exactly sure what you are asking me, but let me give it a shot.
In the article, I mentioned a G13b9 chord and that it was also possible to find other chords inside of that group of notes, G B D F Ab E.
If we take the notes E Ab (also G#) and B, we have an E Major triad. An E major triad contains the notes E G# B. We use the major scale of the tonic chord to name all of the qualities of a chord. A b9 in G is going to be different from a b9 in E–in G, the flatted 9th degree of the scale would be Ab, in the key of E, the flatted 9th would be F. It just so happens that the G13b9 also contains an F (as well as a D), so as you can see, the G13b9 and E7b9 chords are very closely tied together.
G13b9 = G B D F Ab E
E7b9 = E G# B D F
Let me know if I’m unclear.
Adrian Orozco Flores says:
Hola Sr. Neer Mike Me da mucho gusto saludarlo y desearle lo mejor de la vida en verdad quede impresionado con la facilidad de trasmitir sus conocimientos y le admiro por que tocar la lap steel guitar requiere de mucha investigacion y dedicacion Yo soy nuevo en esto pero leyendo sus comentarios aprendi muchas cosas que no hubiera imaginado que se pudieran hacer con la bar de la mano izquierda y el toque de la mano derecha Para despues poderlos transpotar a otros acordes ahi es donde esta la base de todo Si estoy en lo correcto Gracias por su informacion Que Dios siga iluminando su camino Atte Adrian Orozco
Tim says:
First off Mr. Neer, really enjoying this blog so far. Thanks for taking the time and spending the energy on this.
I’m very new to lap steel (I’ve played “regular” guitar for nearly 30 years) and I have a quick question regarding the do’s and don’ts of slants: Why is it better to use the fingers instead of the wrist? I was trying this out last night and found it a little difficult to mute the strings behind the bar when doing slants this way.
And if I may throw in just one more sort of related question: my one and only lap steel is an old Epiphone-made Eddie Alkire 10 string. Could you recommend an appropriate length of bar to use? The Stevens bar that the previous owner included with it can barely cover 7 strings at one time, I suspect most players would want something longer.
Thanks.
Mike Neer says:
Tim, thanks for writing. As far as slanting goes, the proper technique (with a bullet nose bar, not a Stevens bar) would be to use your thumb and forefinger to control it. One reason not to use the wrist is because your wrist couldn’t turn at all of the extreme angles needed to play a lot of the slants in tune. Some slants are pretty extreme, requiring acute angles. It would be near impossible, particularly on the lower frets to really get some of them in tune. I would recommend getting a bullet bar 2 7/8 to 3″ in length, 3/4 to 7/8″ in diameter. Jim Burden makes great bars and they are very affordable. Unless you’re using the Alkire tuning or a tuning with very close intervals, I don’t believe a longer bar will be beneficial. You will almost never have the occasion to play those BIG chords and unless you’re doing very wide octaves (string 10 and string 1) you really shouldn’t need it. Also, the fact is with a longer bar, you lose the ability to do slants. Pedal steel players use a longer bar but generally don’t worry about slants (although some do).
Here is how Jerry Byrd (a master of slanting) described the process:
FORWARD SLANT. Begin by pushing the bar back (to the left) with your thumb so that your thumb is almost at the end of the bar and you can see clearly where the bar contacts the strings, thereby staying on pitch. At the same time, push the bar away from yourself so that your fingers go over the edge of the first string. This movement keeps the rounded end of your bar from dropping between the first two strings. The tip of your first finger (which is arched) keeps the bar positioned correctly on the top string of the slant. To go back to straight-bar position, pull your arm back toward yourself and the bar will naturally straighten.
REVERSE SLANT. For a reverse slant, the thumb goes to the recessed end of the bar where it has good control, and pushes forward (to the right). The first finger, acting as a pivot, keeps the tip of the bar from losing or gaining pitch. Again, push the tip of the bar outward at the same time so it doesn’t slip down between strings.
SPLIT STRING SLANT. This is done by permitting the tip of your bar, the rounded nose, to rest between the top two strings, thereby making contact on either side of the bar at any given fret, and placing the bar on a forward slant so that the third or fourth string can be played one fret lower. Example: Top two strings at fret 4, third or fourth string at fret 3. This makes the playing of more chords possible, and of course it can be done not only on the top two strings but on any two adjacent strings, slanted to one fret lower on a selected string below them. This technique was used in tablature arrangements by Alex Hoapili and Andy Iona for the Oahu Publishing Co., 1939.
Now, to make it clear, I do not arch my finger on top of the bar the way Jerry describes; the very first joint of my finger lays across the top of the bar. I really don’t grip the bar, but instead rely on downward pressure. I realize this is very hard to describe in words–a picture would tell the story better.
BTW, what are you tuning your steel to? Tom Morrell was a great 10-string player who had an E13 tuning that went:
G# F# E C# B G# F# E D E, from high to low. Man, could he get a lot out of it!
Tim says:
Thanks very much Mike for your reply and your detailed advice, I really appreciate it.
As for tuning, I am using a slight variation on the above Morrell tuning, the only difference being the lowest string is tuned to B. I decided on this tuning because almost every basic triad and seventh (and sixth) chord is available without needing to slant the bar — maj7, maj6, dom7, min7, min7b5, min6, and dim are all there. Augmented chords are the only basic chord type unplayable with a straight bar.
I’ve only been at in now for about 6 weeks. Part of me wishes I started on a 6 or 8 string instrument to keep things simpler, navigating 10 strings (particularly with my right hand, I never was much of a finger picker on standard guitar) is pretty challenging. But given the inherent limitations of the lap steel, the additional possibilities afforded by 10 strings make the challenge worth it.
Mike Neer says:
With this tuning you’ll really need to focus on your right hand. Take a look at my Dos and Don’ts #1. That kind of exercise should be practiced daily, and then you should try mixing up the different right hand grips. You don’t even need to use your bar for that. Pluck one string set, then drop the outside of your palm onto the strings to deaden before you pluck the next chord.
The one thing about this tuning is that it is not a great slant tuning. It takes a lot of deft right hand and bar hand technique. You should have a look at the Dos and Don’ts #3, second example. You’ll see the major scale played on just 2 strings. the key is the strings are tunes one whole step apart. On the E13 tuning you’re using, you have 5 possible whole step intervals between the strings. It would serve you well to pick out a pair (start with strings 1 and 2) and learn all the scales in this manner. Lotsa work to do, Tim. Good luck!
One other alternative is to restring and retune your guitar to a C13 tuning to get you more familiar with things you should be learning how to do. This would be my recommendation. I would tune G E C A G E C Bb G lowC. A great tuning! If you think of trying that option let me know and I’ll help you out.
David Matzenik says:
Mike, I have messed around with guitars for decades, but only in the last few years did I decide to get serious. Teaching one’s self is not a great idea, but with Hawaiian or Swing steel there are not a lot of options. So this blog is verfy helpful. I always thought I needed a road map to become a musician and your Does and Don’ts confirm several of my own conclusions. However, and forgive slow perception, I don’t understand what you mean by chord grips. I look for inversions, and love slants both backward and forward. Is the grip the left hand or the bar? And what are we trying to achieve in that straight bar exercise in Item #1? Thanks.
Mike Neer says:
David, in standard guitar playing a grip refers to the left hand on the fretboard. For my purposes, I use grip to refer to the physical shape of the chord plucked by the right hand. The exercise is an example of how we can develop ease and precision in moving from string set to string set, chord to chord. It is purely a right hand exercise. To take it a step further, we can build our blocking techniques in this manner, as well.